|
|
||||||
|
|
|
|
Download | |||
Diamond Version 5 User Manual: Display of structure pictureDesigning bonds and contacts
Previous article: Designing atoms
Like for atom groups, Diamond associates designs, radii, and other properties to each bond group, that means for each atom group combination. When bonds are created, each new bond will get the properties of the corresponding bond group. To get more information about "created" bonds and bond groups, see the article "About toms, Atom Groups, Bonds, and Bond Groups". The properties of every single created bond can be changed afterwards independent from its associated bond group.
This article describes:
· How to edit design, radii, and other properties for the bond groupsmanual_display_bonddesign_bondtypes>manual of the current structure.
· How to edit design, radii, and other properties for individual bonds or contacts.
· About the difference between thin and thick bondsmanual_display_bonddesign_thinthick>manual.
· About fragmentated bonds.
· How to design colors and styles (interior and edge) of a bond or bond group or contact design.
· How to define material properties for rendered representation. · How to assign selected properties to multiple or all connection types or bond groups of the current structure picture. • How to copy the style of a bond and paste it to selected bonds.
Designing Bond Groups
Like with atom groups and created atoms, the design, radius, and other properties of each bond group serves as basis for all created bonds associated with that bond group. That means you can assign properties to bonds according to the atom groups involved. When you alter the properties of one or more bond groups, these changes may overwrite the properties of all created bonds associated with those bond groups.
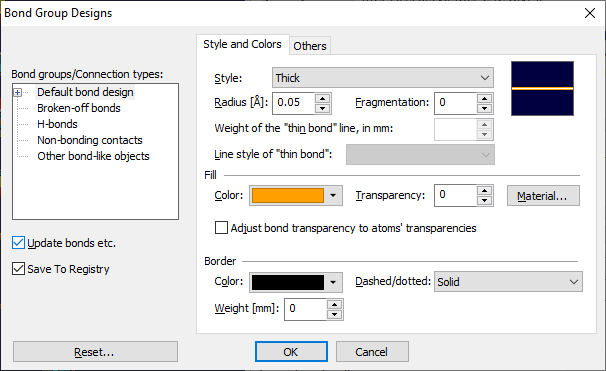
The Bond Group Designs dialog offers two pages:
· Style and Colors: Defines style, interior, edge, and radius properties.
· Others: Defines global settings that apply to all bonds and bond-like objects.
When opened for the first time, the "Style and Colors" page is shown for the default bond design
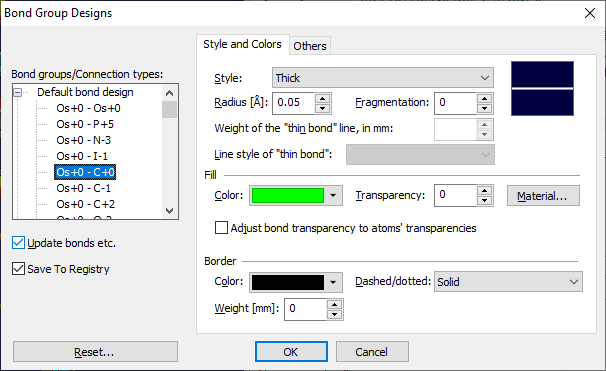
The "Style and Colors" page of the Bond Group Designs dialog for the selected bond group "Os+0"---"C+0"
Select the connection type or bond group you want to edit from the tree list Bond groups/connection types at the upper left of the dialog window, and make the changes on the Style and Colors page of the dialog as far as needed. You will find details about colors, styles, radius, etc. below in this article:
- Colors and Styles,
- Material Properties.
Updating existing bonds
By default, Diamond updates all created bonds (and H-bonds and contacts) when you close the Bond Group Designs dialog with OK.
That means each created bond etc. gets the design of its associated bond group (or connection type), like it is done with atom groups and created atoms.
To disable this automatic update mechanism, switch off the Update bonds etc. checkbox.
Defining a default bond style While designs can be stored for every atom group in the Diamond section of the Windows Registry, bond group designs cannot. Instead, Diamond accesses a default bond design when creating new bond groups. You can define the default bond design by selecting the corresponding item in the list and adjusting the settings on the Style and Colors page.
Resetting connection type and bond group designs This restores the designs of all bond groups of the current compound to the design selected as <Default bond design>, if "Default bond design" (or a bond group) is selected. If one of the other connection types is selected (e.g. "non-bonding contacts"), it resets the default designs for contacts, H-bonds and other bond-like objects, rsp., to factory settings.
Designing Selected Bonds
This part of this article describes how to edit the colors, style, radius, and material properties of a single bond
or contact or of multiple selected bonds and/or contacts. These settings are defined in the Bond and Contact Designs dialog, which uses the same two pages as the above described Bond Group Designs dialog
Editing a single bond's or contact's properties
The easiest way to design a single bond or contact is to double-click on the bond or contact, rsp.
Instead, you can click with the right mouse button on the bond/contact, and then choose the Edit -> Bond Design command from the context menu. Editing properties for multiple bonds and/or contacts
Select the bonds and/or contacts you want to edit. There are several ways to select bonds; see the article "Selecting objects". Then click with the right mouse button into one of the selected bonds/contacts, and choose the Edit -> Bond Design command from the context menu. As for selected atoms, properties which are not unique for all selected bonds or contacts, keep blank in the corresponding control in the dialog window. For example, if you have selected nine bonds with the interior color red and one with yellow, the color selection field for the interior color will be empty. If you leave this field empty, the interior colors of the selected objects will be untouched. If you select a color, all selected bonds will get that new interior color.
Thin vs. Thick Bonds
While there are a lot of styles with different ORTEP-like patterns for atoms, bonds can have two different styles only: Thin and thick. Besides this, you can further assign the style "invisible".
Thin bonds are displayed as lines only. These lines can have a dotted style instead of the default solid line style and a defined thickness in millimeters to enhance them in the structure picture. In rendered representation, these thin bonds are also represented as lines only instead of 3D objects (cylinders), and will thus not be shaded.
Thick bonds are displayed as 3D objects, that means as cylinder, which may be distorted due to perspective transformation or a 3D effect, called bond tapering.
In extereme cases these cylinders become cones. The radius of the bond is given in Angstroems units. In rendered representation, thick bonds are displayed as 3D objects and can be shaded like atoms.
Design and relative length of broken-off bondsBoth Bond Design and Bond Group Designs dialog have a second page beneath the Style and Colors page. On the Others page global settings that apply to bonds of all bond groups can be adjusted. In the current Diamond version there is only the relative length to be used for broken-off bonds. Broken-off bonds are bonds between atoms at the borders of the structural model and their invisible hypothetical neighbours just outside the model. These bonds are generally shorter than they normally would be; you can adjust their length by modifying this factor. This factor is given in the input field Relative length of broken-off bonds. Note that this factor is a global value used for all broken-off bonds in a structure picture. It cannot be varied individually like colors or styles of individual bonds. The basic design of broken-off bonds can be defined on the Style and Colors page of the Bond Group Designs dialog by selecting the item "Broken-off bonds" in the tree list of connection types and bond groups. Like regular bonds, you can change colors, styles, and fragmentation later individually for broken-off bonds - but the relative length is the same factor for all broken-off bonds within a structure picture.
Fragmentated Bonds
If you cut a bond into pieces each with the same length and with voids between having the same size, you get what Diamond (and at least SCHAKAL) calls a "fragmentated" bond.
Fragmentation can be applied to both thin and thick bonds.
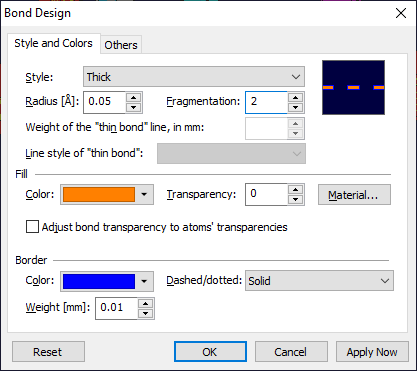
To define a bond as fragmentated and define the number of voids between the fragments, choose the Bond and Contact Designs command from the Display menu,
and select the Style and Colors page of the dialog. (This may be the Bond Group Designs or Bond and Contact Designs dialog depending on the situation.)
Edit the number of voids in the input field Fragmentation. A number of zero defines a "normal" bond without fragmentation.
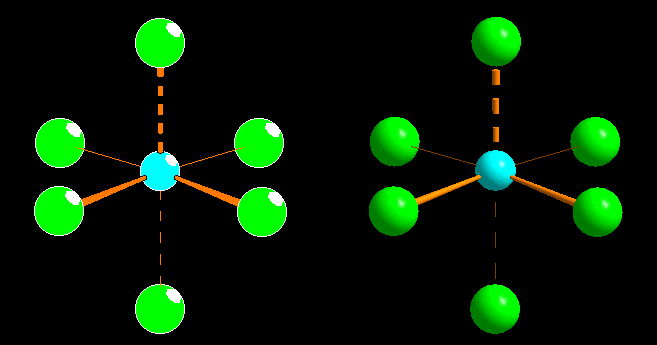
Several bond styles in flat (left) and rendered (right) representation: Thin bonds (in the rear), thick bonds with a radius of 0.04 Angstroems appearing as tapers (bond tapering factor of 0.8) (in the front), a thin fragmentated bond (going to the bottom atom), and a thick fragmentated bond (going to the top atom), both with a fragmentation of 4.
Colors and Styles
The design of a bond or bond
group or any other connection type (e.g. contact) is made up of the following settings:
Since rendered representation uses no edges, the settings edge color, pen, and thickness will be used only in flat representation.
You will find all these settings on the Style and Colors page of the Bond Design dialog or Bond Group Designs dialog, rsp.
Interior color and brush; Edge color, pen, and thickness
Interior color and brush as well as edge color, pen, and thickness of a thick bond works in principal like for atoms,
so please compare with "Colors and Styles".
For a thin bond (or contact), the interior color is used to define the line color, whereas the line style (solid, dotted, etc.) and thickness are defined by the edge pen and thickness.
Rendered representation
When using rendered representation, bonds/contacts use the interior color only. No edge is used.
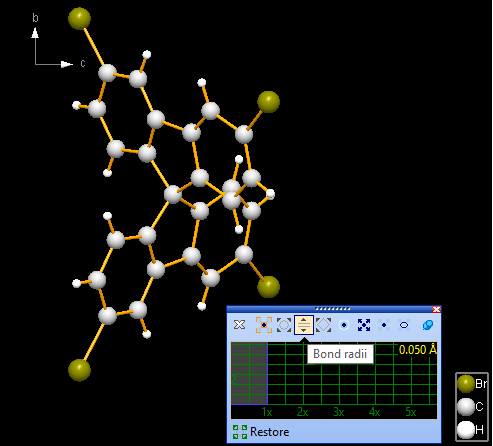
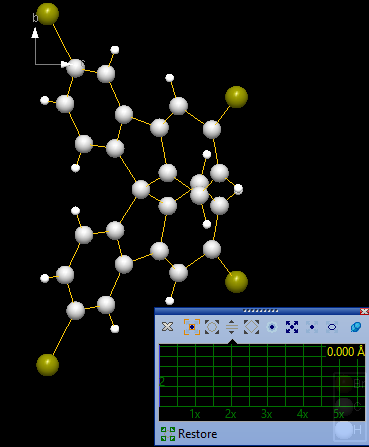
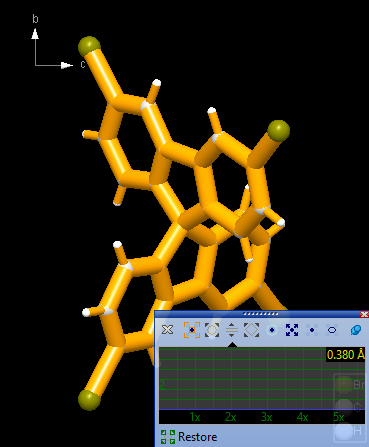
Using the mouse wheel to change bond radiiDiamond offers several so-called "mouse wheel modes". These modes have in common that a tick of the mouse wheel changes a property each. (To get more informations about the several mouse wheel modes, read the article "Using the Mouse Wheel".) Here we show the wheel mode to scale radii of (thick) bonds and contacts. It either applies Every tick of the mouse wheel increases the radius of the (selected) bonds/contacts by some percent. The starting point is 100 percent (or "1x"). To enlarge the bond/contact radius/radii, move the mouse wheel forward. To reduce the radius/radii, move the mouse wheel backward. The maximum value is reached, when the radius corresponds with the radius of the connected atoms, whereas when the minimum value (radius zero), the representation turns to thin (wire) bond/contact each.
To start the wheel mode "bond radii" either: Alternatively, you can do a long click with the mouse wheel button, which selects the whole molecule. (The blue markers now frame the whole molecule.) The histogram in the control window shows the scaling factor relative to the starting point of the mouse wheel mode ("1x", "2x", etc.).
Since no bond has been selected in our sample structure picture, the "Bond Radii" mouse wheel mode refers to all bonds in the structure picture. (There are no contacts in the picture.) When starting the wheel mode, the blue ruler is on the "1x" position. The (absolute) radii of the bonds are given in the top right of the histogram, here all bonds have the default radius for thick bonds: 0.05 Å. Scale the bond radii factor relative to the radii when the mouse wheel action has started (100 percent or 1x) by turning the mouse wheel up and down. You can click on the Restore button (below the histogram) to reset the bond/contact radii to the original sizes they had when you started the bond radii mouse wheel mode.
The pin button at the right end of the upper icon row changes between permanent and temporary display of the control window. To re-display the control window after it has disappeared after a short while, press the F7 key. The small red/white 'x' in the right end of the title bar of the control window hides the window. To terminate the bond radii mouse wheel mode, either simply press the Escape key, or click on the closing button of the mouse wheel control window (the left-most in the upper icon row: the 'x' symbol.
Material Properties
A bond uses the same material properties as an atom, as far as it has been defined as thick bond, and rendered representation has been enabled. Then it is drawn as a real 3D object (a cylinder that may be distorted to a taper) and thus can be shaded. If it has been defined as thin bond only, it will be drawn as a simple line instead without shading effects. For the different material properties, see the section "Material Properties" in the article "Designing atoms".
Assigning Selected Properties to Multiple or All Connection Types
Suppose all your bond types use thin green bonds, and now you want to assign all bond types thick yellow bonds with black edge, you could - one bond type after the other - select the bond type, change style and colors, then select the next bond type, change style and colors, etc. To avoid this, the connection type and bond group tree list offers multiple selection. So simply select all bond groups and/or connection types in the tree list, then set the properties in the Colors and Styles page.
Copying and Pasting Bond Styles
Like for atoms, Diamond offers a powerful and easy to use way to assign a style to one or more selected bonds (or contacts or H-bonds):
1. With the right mouse button, click on the bond whose style (colors, edge, radius, fragmentation, material properties) you want to assign to other bonds, and choose the Copy Style command from the context menu.
2. Select the bond or multiple bonds (or contacts and/or H-bonds) you want to assign that design to. With the right mouse button, click into one of the selected bonds, and choose the Paste Style command from the context menu.
Previous article: Designing atoms
References: |
|
Page last modified October 17, 2024. Copyright © 2024 Crystal Impact GbR. All rights reserved. Contact Webmaster |